How to Enable NetSuite Analytics Warehouse (NSAW) for the First Time
Enabling NetSuite Analytics Warehouse (NSAW) opens the door to powerful reporting and data visualization capabilities. This guide walks you through each step needed to enable your NSAW instance.
Step 1: Use an Administrator Role
Start by logging into NetSuite as an Administrator . The user who enables the pipeline becomes the owner of the NSAW configuration, so it's best to use an account with full access from the beginning.
Step 2: Enable Token-Based Authentication
-
Go to
Setup > Company > Enable Features - Click on the SuiteCloud subtab
- Scroll to the Manage Authentication section
- Check the box for Token-Based Authentication
- Click Save
Note: If TBA is not enabled, you will not be able to activate NSAW.
Step 3: Enable NSAW and SuiteAnalytics Connect
-
In the same
Enable Featurespage, go to the Analytics subtab -
Under
Connectivity
, check:
- SuiteAnalytics Connect
- NetSuite Analytics Warehouse
- Click Save
Step 4: Wait for Activation Email
Once enabled, NetSuite begins provisioning NSAW. This usually takes about an hour .
The user who initiated setup will receive a "Welcome to NetSuite Analytics Warehouse" email once provisioning is complete.
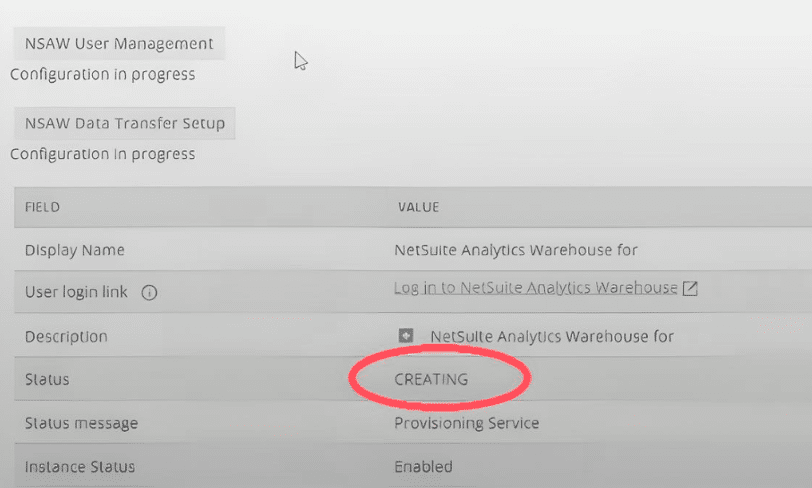
Step 5: Check Provisioning Status
-
Go to
Setup > Integration > Configuration(under the NetSuite Analytics Warehouse section) - Find your NSAW configuration
- Look at the Status Message column
If it says "Creating" , the system is still working. This will update automatically.
Step 6: If You See an Error Message
Occasionally, you may see the following:
"We're not able to create the NetSuite Analytics Warehouse instance now. Please contact support."

This isn’t common, but if you see it, submit a support ticket to NetSuite Support . We've always had positive experiences with NetSuite support resolving this issue in the past.
Step 7: Configure the Data Transfer Settings
-
Go to
Setup > Integration > Configuration - Click NSAW Data Transfer Setup
Choose the Initial Extract Date
This sets how far back NSAW will pull data. If you're a new NetSuite user, select a date before your first transaction. Long-time users may want to limit history to reduce load time.
Select the Subsidiary
Choose the top-level subsidiary for full visibility. You can select a lower-level subsidiary if needed.
Note: Every change may trigger a “Loading Functional Areas” message. Be patient—this is expected.
Toggle the Functional Areas
You’ll see a list of areas like Transactions, Items, and Accounts. We recommend enabling all of them —there are no extra licensing costs, and it gives you full access for analytics.
Step 8: Be Patient with the Initial Extract
After saving your selections, the initial extract process begins. This can take several hours as NetSuite:
- Pulls historical data
- Creates table structures
- Loads data into the Autonomous Data Warehouse
Pro tip: Many users configure this and check back the next morning. Initial loads are slow—this is normal.