Turning On Churn Prediction in NSAW
If you attended NetSuite’s SuiteWorld conference this year, you may have seen the new Churn Prediction feature being demoed as part of the predictive applications feature. What was previously a beta feature is now generally available with the Platform 25.R3 – August 2025 release.
In this article, we are going to walk through enabling this feature in NetSuite Analytics Warehouse (NSAW) and highlight a few things to keep in mind before doing so.
Why This Feature Is Worth Trying
Before I was working as an NSAW consultant, I spent a lot of time building machine learning models and I know how long it usually takes to build a predictive model from scratch. It can take weeks or even months just to figure out which features matter, not to mention training and validating the model.
Individual results will vary but the fact that NSAW now offers a churn prediction model you can turn on with a few clicks and have results the next day is impressive. It is another example of how NSAW delivers fast time to value. Even if you are just experimenting, it is worth turning it on to see what kind of results you get.
Important Note Before Enabling
When we enabled churn prediction for a client on a Tuesday, it seemed to cause the warehouse refresh to run longer than expected the next morning. This could have been a coincidence, but to be safe we recommend enabling this on a Friday afternoon to let it train over the weekend . If the initial model training impacts refresh time, then the delay can happen during off hours when it's less likely to affect end users.
To be fair, that client has a much higher transactional volume than most, so you may not notice any delays. However, since this is something we are still experimenting with, it's always better to play it safe.
Follow the Docs up to Step 5
NetSuite’s documentation for setting up churn prediction is solid and easy to follow.
Some people that we talk to tend to get confused at Step 5 , so I recommend following the official documentation and coming back to this article when you get to step 5 to better understand these settings.
Read this until step 5: NSAW Predict Customer Churn DocumentationStep 5: Auto vs Manual Method
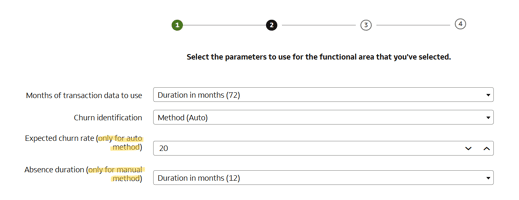
Auto Method
If you choose the Auto option, the only variable that matters is the Expected Churn Rate . The interface also shows Absence Duration , but Auto ignores it. This is what confuses people.
The Expected Churn Rate is a number between 1 and 99 and represents the percentage of customers you expect to churn. If you know that your churn rate is around 20 percent, enter 20 . This is a good option if you have already analyzed your churn rate.
Manual Method
If you do not know your churn rate or you want tighter control over how churn is defined, use the Manual method. In this case, ignore the Expected Churn Rate even though it still shows in the interface.
You define churn by specifying an Absence Duration . For example, if you set the duration to 12 months, a customer is considered churned after 12 months with no sales.
You Can Switch and Experiment
You can try both methods. If you start with Auto and the results are not what you expect, switch to Manual and try again. It is simple to change and re run the model.
What Happens After It Is Enabled
After the model runs, you will see a new dashboard in your catalog called netsuite-churn prediction . This dashboard mainly provides instructions and context. It describes the subject area and the things you can do with it. It does not include out of the box visualizations or insights.
In a separate article we will walk through building your own dashboards using this data.
Wrapping Up
Churn prediction in NSAW is easy to turn on and it is worth trying. Whether or not the first run is perfect, the low effort makes it a strong starting point for experimenting with predictive insights in your business.